Cheap Video Conferencing With The Pi

I was recently asked about using a Raspberry Pi for Skype by a colleague at work and since I didn’t know anything about using one for video calls, I figured it would make a good project. Read on whilst I tell you how I got video-calling going so that you too can enjoy cheap and easy conferencing!
Firstly, here’s the equipment I had which I can vouch for. I am sure there are other combinations, but stick with these and it will definitely work.
Ingredients
- A Raspberry Pi 4, 4GB of RAM
- Power Supply
- MicroHDMI cable
- SD Card with Raspbian on it
- Much of the above can be bought as a package.
- A Logitech C270 Webcam
- A USB keyboard
- A USB mouse
Optional For Flavouring
A Techole 3 in 1 Out HDMI switch
Pi Case
The Pi Parts
I’m going to assume you know how to get Raspbian on a Pi going and put it all together. If not, there are some good articles like this or this, but what about my choice of Pi? Well, I reckon you could get this working with the older types such as a Raspberry Pi 3 B and the only trade-off will probably be speed and smooth video, but you will need to experiment to find out. For the amount the fully armoured Pi costs, you might as well future-proof things and go for the best.
The Webcam
I had a Logitech C270 lying around so that was perfect. Even better, it has an in-built microphone, so you can kill two birds (audio and video) with one stone. Moreover, it is also an established branded camera so compatability is good on the Pi. Lastly, only one USB port needed!
Keyboard and Mouse
You will need these to configure the Pi, but maybe later, once it is all installed and you have added all contacts you need, you can do away without the keyboard. It all depends on how you set things up.
Optional Parts
I recently bought the Techole switch on Amazon’s Black Friday deal and am really pleased with it. It comes with a far-too-short power cable and plug, but you don’t need either because I have found that it works fine drawing it’s power from the HDMI cables. What makes this really useful though, is that you can use this on your TV and you will only need one HDMI port. If you have more available on your TV (and many do), you don’t need it, but when setting things up on the computer using the monitor, it is such a timesaver. So, consider getting this or something similar.
The Pi Case is also not necessary but it means you keep your Pi protected from the elements and sticky fingers.
Attaching Peripherals
Begin by plugging in the keyboard and mouse, then booting up the Pi and going through the usual set-up procedures if you need to. Next, insert the USB of the webcam and you will be ready to start as it should be recognised immediately.
Skype
My advice? Try something else. If you Google, you will find various threads which say it might be possible. Or that you can use the web version. Or that if you install ExaGear desktop, it will work natively, but I wouldn’t bother. With a bit of searching, you may also realise there is a communications hub you can install called Pidgin and with it a plugin for Skype. Despite my best efforts, though, I couldn’t get it working.
Fortunately, there is a much easier way and that is to use Google Hangouts which works straight from the browser and doesn’t need to have anything installed. Fab!
Sound
A quick note about sound. At first, when setting things up, I couldn’t hear anything through my headphones. After a bit of head-scratching, I realised that the HDMI cable was sucking up the audio, so what you need to do is tell the Pi not to send it there. Let’s start by making sure the sound utilities are installed (they should be) and that the audio is enabled. Begin by opening up a terminal (black square with greater than arrow in it, below):

Now type these commands:
1 | > sudo apt-get install alsa-utils |
Next, to force the sound out through the headphones, you can do this:
1 | > sudo amixer -c 0 cset numid=3 1 |
FYI, if you want to send it back through the HDMI cable (perhaps when you are done and want to attach it to your TV or a monitor with audio), you can run a similar command:
1 | > sudo amixer -c 0 cset numid=3 2 |
As you might have guessed, “1” means use the headphones for output and “2” the HDMI cable. There is also a “0” which means auto, but I didn’t try that and/or it didn’t help me, initially.
Lastly, here’s a handy test file that should be on the system which you can use to see if you can hear anything:
1 | > sudo aplay /usr/share/sounds/alsa/Front_Center.wav |
Time to Hangout
On the Pi, open up the Chromium browser (blue world icon) and visit: https:\hangouts.google.com. Sign into your GMail account using the blue sign in button in the top right.

Settings
If you click on the Video Call circular button…

…you should see your webcam busily showing something.

If so (and if not!), click on the cog icon at the top of the screen and ensure your settings look a little like this:

Close this screen by clicking DONE. Now, in theory, you should be able to get a video call going by inviting another party using the big green button at the top, but what I found was that it worked better if I used Google Hangouts on my phone (or a web browser on another computer), to call the Pi. Once that first contact had been made, the Pi’s version of browser-based Google Hangouts worked much better.
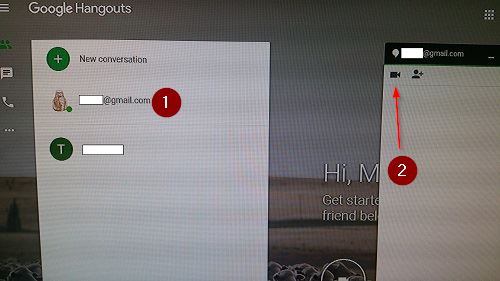
Here’s what my browser looked like after I had done that:

Click on the person (1) to bring up the window to the right, then the video icon to make the call (2).
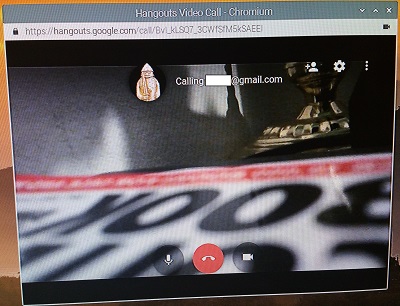
Once you are done, click the big red button with a phone handset in it to end the call. All being well, you should now be good to go.
Feedback
Before I finish, one thing that caused me a problem was feedback. When you test this, don’t have both microphones (the one on your Pi and your test subject who you will call) in the same area of you will get some nasty screeching loop!
Let me know how you get on by email or twitter!
Hi! Did you find this useful or interesting? I have an email list coming soon, but in the meantime, if you ready anything you fancy chatting about, I would love to hear from you. You can contact me here or at stephen ‘at’ logicalmoon.com