Accessing an Unreachable Raspberry PI 3 After a Motion Eye Snafu
I’ve got a Raspberry PI on which I have installed Motion Eye OS. This is a great tool and I readily recommend it, but like a ding-bat, I managed to lock myself out of the machine when I set the static IP address incorrectly, then rebooted. No matter what I did, I just couldn’t SSH back on, access Motion Eye or even log on to it directly using a keyboard, despite knowing what I needed to do to rectify the problem.
I had two options - one, reinstall the whole SD card, including Motion Eye OS, my configurations and who knows what else, or two, try to edit the file system directly. That felt a whole lot easier!
These steps will tell you what I did and what resource helped me, but this is also useful if you need to get back onto your Raspberry PI on a Windows machine for any other reason connected with bad config files that you can edit away.
Firstly, make sure you have Virtual Box installed and then create an Ubuntu VM. It doesn’t have to be that flavour, but it just so happens to be what I had anyway. Next, you need to plug in your SD card in one of those SD card readers - mine is the portable type. Let’s start by finding out what this is called (here‘s where I found most of this out, by the way) insinde an administrator shell:
> wmic diskdrive list brief |
PS C:\> wmic diskdrive list brief |
In my case, I’ve run this AFTER I took out my SD card, but what you can do is look at the size. I knew mine was 4GB so I looked for something of that capacity in bytes. Do be careful though :-) Now we need to make a Virtual Machine Disk File and for that, we are going to use VBoxManage which will have been installed with Virtual Box. I found it worked better if I cd’d into the folder before running my command, like so:
> cd "C:\Program Files\Oracle\VirtualBox" |
Don’t just copy that as is, though! You will need to change the location that it writes the vmdk file (I used f:/) plus the name of the rawdisk. Above it is PHYSICAL2 but for you, you need to refer to the output of that command we ran just a minute ago. All being well, after a few seconds, that should be created. Let’s head back into Virtual Box and continue with the steps that Rizwan showed us.
Step 3 – Attach RAW Disk to VM
Next attach the raw disk VMDK to guest VM within the VirtualBox UI
- Ensure the Guest VM is not running.
- Ensure VirtualBox is not running.
- Start VirtualBox by right-clicking on it and choosing “Run as administrator”.
- Open the settings area for the guest VM.
- Click on “Storage” in the toolbar.
- Next to the controller click on the icon to “Add Hard Disk”.
- Select “Choose existing disk”.
- Navigate to the c:/Hard Disks/sdcard.vmdk and select it.
- You should now be returned to the Storage tab and see your sdcard.vmdk in the list.
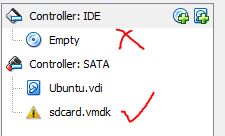
Be careful when adding the storage though. I added mine to the IDE part and that caused me problems in booting up. You want it to go underneath your vdi file as I have shown below:

Yours won’t have a yellow triangle like mine though - that’s just because I am writing this up after I’ve done what I needed to and shut it all down. OK, the last step Rizwan talked about what starting up the VM and logging in; do that, and I’ll take over from there. In Motion Eye OS, there is a file called static_ip.conf that had all of my damaging changes, so for me, that’s what needed to be edited next.
- Open up the file manager.
- Edit /etc/static_ip.conf using something like gedit.
- Remove all contents.
- Save file.
If you don’t have the file manager, you can access it from the shell, but you will need to find out where the SD card was mounted.
- Run the mount command.
- In the output, look for any sign of your SD card. Here’s what I found:
- /dev/sdb3 on /media/sm/f15e1ff2-7304-4bfc-914e-b8863c1e9c73 type ext4 ….. and some other stuff. I knew the ext4 was the Raspberry PIs SD card file system and it was mounted in a OS place, so bingo, that was it.
- Change directory: cd /media/sm/f15e1ff2-7304-4bfc-914e-b8863c1e9c73
- List the directory to confirm: ls
In here, I found etc, log, lost_found and a bunch of other directories, so all good. Now edit the file using the command line:
- cd etc
- nano static_ip.conf
- Remove all lines with control-k.
- Save the file with control-o.
- Exit nano with control-x
Shut your virtual box down, remove the storage from the storage area, and enjoy your Raspberry PI once more!
Hi! Did you find this useful or interesting? I have an email list coming soon, but in the meantime, if you ready anything you fancy chatting about, I would love to hear from you. You can contact me here or at stephen ‘at’ logicalmoon.com