A Simple GitHub Action to Deploy Something

Having sorted out my previous issue with not being able to push my GitHub workflow to my repo, the next step was to automate the build of my blog. That’s what this blog entry is about - using GitHub Actions to automate the deployment of my Hexo blog, after a push to my GitHub repo.
To get to this point, I watched an excellent video by Ryan Chandler named GitHub Actions for PHP Developers, and found this GitHub Action by Appleboy. Have a quick look at both before reading on.
Before we get down to the details, what did I do manually (in the old days, before electricity) to deploy my blog?
- I wrote my blog post with Hexo.
- I then added it to my local repo and committed it.
- Next I pushed my change to my GitHub repo.
- When I was ready, I then logged on to my remote server.
- I used the
cdcommand to change into my blog folder. - I pulled my latest changes down from GitHub.
- I ran a custom build script (which I wrote about here)
I’ll be honest, writing that little big list down, made it feel much worse than it is, but either way, I would rather be doing something else with my time. Want to have a go? Let’s begin with the first step, which is setting up the workflow file.
Create a GitHub Workflow File
This is the file that GitHub Actions uses to know what to do, when you want to do some CICD (continuous integration, continuous deployment). In this case, it’s just the CD part, but that doesn’t really matter.
To start, in the root of your local Git repository (or online, at GitHub), create a folder called .github and inside that, another folder called workflows. This is where we are going to store our script which will do all of the work.
Next we are going to create a .yml file, pronounced “Yam-ul”. You can name this whatever you like, but let’s choose deploy.yml.
Now, please note: I am going to show you my script and explain how it works. Of course, without changing it, it’s not much use to you - I know! - but follow along anyway, and alter it at the end, OK? You can see what are specific to me and exactly what you will alter for your case, so don’t fret.
Since that’s out of the way, create that file (deploy.yml), and paste in the following commands:
1 | name: Deploy Blog |
Let’s break this down into parts, and describe those, one by one.
The Script
This part is where the action of Actions happen (the bit you will want to change), and can be seen here:
1 | script: | |
The pipe symbol on the first line indicates that we are about to run several commands (or at least, can do). The initial command changes to my blog’s local git repo directory at /var/www/logicalmoon.com on the server. Next, we do a git pull and finally, we run my custom build script build.sh. What happens in that has already been described elsewhere, so I don’t need to go over it. These steps all pretty much match my pre-electricity method from the start of the post.
That’s all well and good specifying the commands to run, but how does this GitHub Action log onto our server? For that, we need to talk about secrets.
Logging Onto The Server
Back to the .yml file, here’s the section mentioning the secrets, just under the with:
1 | host: ${{ secrets.HOST }} |
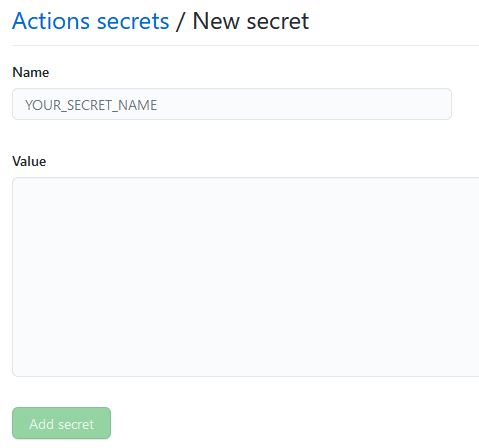
We specify the host, username, password and port using GitHub repo secrets. These are encrypted values that the action can inspect, but which don’t need to be stored in the actual action .yml file. That’s just as well, really, because all sorts of breaches and problems can occur when that is done accidentally.
So where are they? They are actually attached to your repo and in my case, that’s my blog repo named logicalmoon.com. You can get to them by visiting the main page of your repo in GitHub followed by: Settings > Secrets.
There, you need to click on the button labelled New repository secret and add in a secret for each of the four items mentioned.

Host will be the IP (or public DNS name) of your server, username and password are as you would expect, and the port is 22 - for SSH, which is what we will be using to log on.
Once you’ve added your secrets, it should look like this:

Each of those settings are specified in the Action created by appleboy and detailed on the action’s README.
So now we had better reference the action script that we are using in this deployment.
Specifying the Action to use
The key part of our deploy.yml is this:
1 | - name: executing remote ssh commands using password |
Here, we just give this part of the process a name on the first line. That can be anything really. The special part is the uses though because that points to the Action we are going to use to do all of the heavy lifting in this deployment. There are many actions, written by Microsoft/GitHub and the community, so do have a look around at what is available.
In this case, we’re using the one by the GitHub user appleboy and very grateful am I that it exists!
Stopping on Errors
This is worth mentioning because I specifically wanted the whole action to end should anything not work as expected. appleboy created an option with the Action which allows just that, and that’s what this part achieves:
1 | script_stop: true |
On error, the script stops immediately.
Triggering the Action and Remaining Parts
Let’s catch up with the last bits of the script worth mentioning, to finish off:
1 | name: Deploy Blog |
We give our GitHub Action a name, which is Deploy Blog.
What triggers it is a push to the repo. There are other triggers you can use and can read more about here.
jobs are a set of steps that execute on a runner, where a runner is a bit like a process that executes jobs, and is usually hosted by GitHub. deploy-blog is the name of our job.
Lastly, runs-on specifies that we would like to run these commands on the latest edition of Ubuntu.
That pretty much covers the script. You can take much of it and use it as-is I think, but naturally, if you need something more sophisticated or have other requirements, you will need to dig back into the documentation.
Is This Free?
You might be wondering how much does all this cost? Well, for public repos, it is free, but if your repo is private AND you aren’t a paying member of GitHub, there are limitations. For most, that won’t be a problem, but do keep an eye on your usage.
I hope you found that useful and it gets you started with GitHub Actions. In my opinion, they are awesome!
You Didn’t Mention Running It!
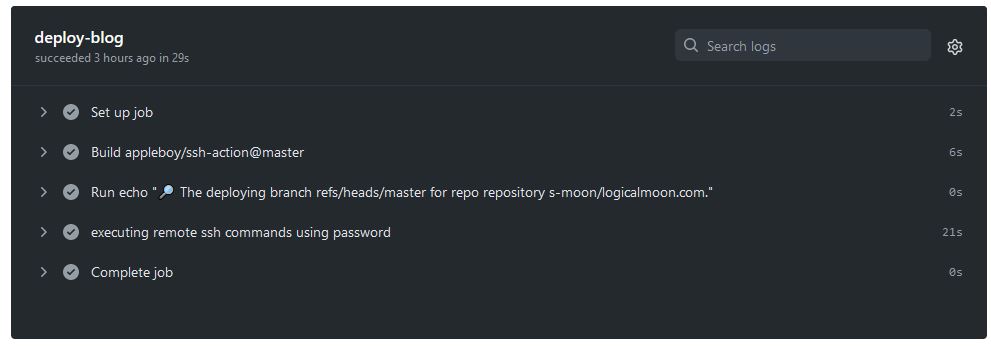
I know, I nearly forgot to show you what happens when the action runs. Imagine you have just pushed to the main branch.
Give it a second or so, then go to your repo and click on Actions - you will see the output it generates as it runs, and whether it was successful or not. Here’s mine in all it’s glory.

And if you click on the name, you can see some of the output. Ignore the bit about “deploying branch…” I took that out of my script above because it wasn’t important, but it’s still in my deploy.yml!

I’m going to be using GitHub Actions more, so expect to see more ramblings on this topic!
Hi! Did you find this useful or interesting? I have an email list coming soon, but in the meantime, if you ready anything you fancy chatting about, I would love to hear from you. You can contact me here or at stephen ‘at’ logicalmoon.com