Cool Visual Studio 2017 Tip #2 : Disassembling C# into Intermediate Language
You may already know this, but when you compile one of your .NET projects into an executable, it is actually translated into something called Intermediate Language, or IL. If you were to take a look at it, it would look a lot like assembly language and it is this that the Common Language Runtime (CLR) executes using the Just in Time compiler (JIT). Phew – that was a lot of acronyms for one sentence so for a reprieve, let’s see what I am referring to, before I continue:
1 | 002E0472 xor edx,edx |
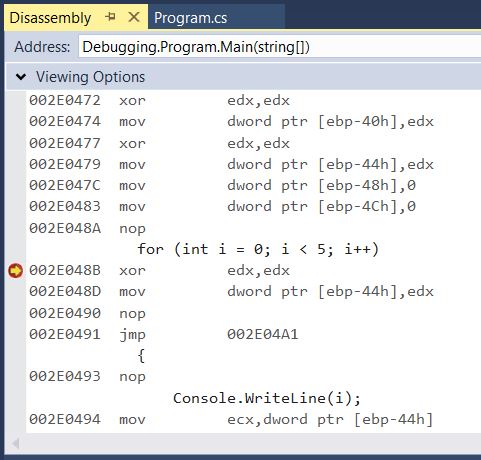
Pretty obscure if you’re not used to seeing this kind of thing right? Along the left column are the addresses in the memory space. The next column is the IL instruction: xor mean exclusive or (check out your logic rules!) and mov means to move values between either registers (think of a fixed number of variables, if you like, or memory locations). This isn’t a how-to on IL, so I won’t say much more for fear of really exposing my ignorance!
Anyway, something I recently realised is that you can see the IL for your code and can step through it using the debugger which makes or some interesting situations. For example, if I write a program which loops an integer variable from 0 to 4, printing the value on the screen, using two different types of loop, will the compiler realise and generate the same IL? Let’s find out and at the same time, allow me to show you how to use this interesting feature of the Visual Studio toolkit. I’m running the latest 2017; to follow along, start-up VS, select a .NET Framework console application and paste the following code in:
1 | using System; |
Next, place a break point onto line 9 - the start of the for loop – press F5 and we’ll be ready to begin. You should now have started your program in debugging mode which will open up more options in the Debug menu so select Debug > Windows > Disassembly. If everything is working as expected, you should see the following:

To step through it, just use your usual debugging F keys such as F10 to move to the next statement. From here, you can stop reading and explore but I took a little look at some of the output and made some observations that you might find useful, drawing on my own experiences when I used to write assembly language programs. Note, therefore, I might be wrong about some of my ideas – I haven’t looked any of this up because I am out of Internet range for a few days :-)
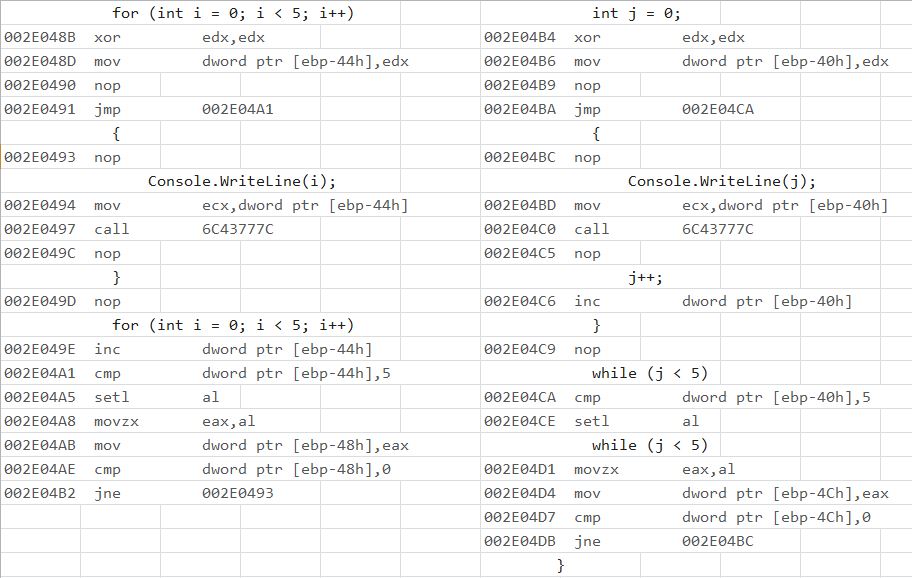
Here’s the code produced with the for loop on the left and the while loop to the right:

- In my two contrived examples, the produced code is remarkably similar. The only real difference is that there is an extra instruction (NOP) in the for loop.
- Those NOPs are known as no operations which is a fancy way of saying do nothing - literally. I’m not sure why these are there. Is it that certain instructions need to start on particular memory boundaries (like addresses divisible by 2) or is it a direct representation for the braces?
- Setting variables to zero seems to employ using xor to zero the bits. I’m guessing this must be faster than some code of mov register,0.
- To output strings to the console window, you do this: call 6C43777C. The instruction before must be about setting up what to print.
- You can see where it is comparing values to 5 to decide whether to continue or not. See the two types of cmp instruction – one comparing with 5 and the other 0. I am not sure why it is doing things this way – can’t you just compare to 5 and be one with it?
I’m sure you could glean a whole lot more about how the compiler works or what these instructions really mean so there’s plenty for you to follow up on if you are so inclined.
Hi! Did you find this useful or interesting? I have an email list coming soon, but in the meantime, if you ready anything you fancy chatting about, I would love to hear from you. You can contact me here or at stephen ‘at’ logicalmoon.com